2. Conception Assistée par Ordinateur (CAO) = Computer Aided Design (CAD)#
This week we learned the bases of CAD by learning how to use apps like OpenSCAD and FreeCAD for 3D and Inkscap for 2D. All these softwares are open-source as usual in this course. Our goals were: * Learn about compliant mechanissm and flexures * Evaluate and select 3D software * Demonstrate and describe processes used in modeling with 3D software * Learn about code licenses and how to use them. * Build on other people’s code and give proper credit.
2.1 Inkscap#
This software is used to do drawings using vector. The interface is easy to use and with it we can start from zero or edit pre-existing files. For this course one of the main use will be to transform an image with pixel into a image with vectors (.png or .jpg –> .svg)
2.2 OpenSCAD#
We use OpenSCAD to create 3D models/pieces. Here is the link to download the software. To create a shape we use coding and OpenSCAD has a unique syntax that is very easy to use and learn. Here is a link to a cheat sheet with all the commands possible. Personally, I think OpenSCAD is the easiest program to use among the 3 we were shown this week and so I used it to create my pieces. So here are some tips for you: 1. Use the cheat sheet and don’t hesitate to click on the word in blue that are underlined because it will send you to this page where all the commands are explained in detail for you with the variables needed for each one 2. There are 2 modes to visualize your pieces: - The first sign =’calculer l’appercue’ is a dotted cube with the following sign ‘>>’ and is used to pre-visualize your piece so it will be a bit messy BUT it’s very fast so very useful while doing/creating the piece. - The second one =’calculer le rendu’ is a cube with an hourglass, this one is used when you want a clean visual or before exporting your piece and it’ll take longer (time depend on the piece)
2.3 FreeCAD#
This is also a 3D vector drawing softare, wich gives you a lot of options todesign your piece. This software is more complete than OpenSCAD but I find it more difficult to use.
2.4 Flex link#
The end goal of this week is to create a piece with a flex link that we will 3D print next week. A flexlink is a compliant mechanism so a mechanism that has a certain mobility due to its shape and not its materials.
This project could be done in group and I decided to work in pairs with Emma and we chose to do a catapult! We decided to use OpenSCAD since I found it very easy to use; however, Emma was more comfortable using FreeCAD so I helped her with the commands of her code to have in the end two codes for our two pieces that would be coherent with each other. The key to do so was to use parametric variables = putting names for the variables and not values so if we change values we can just change it next to a variable name and not search in the code. This is very important to do especially if you are working with someone or want to share your file.
2.4.1 My piece#
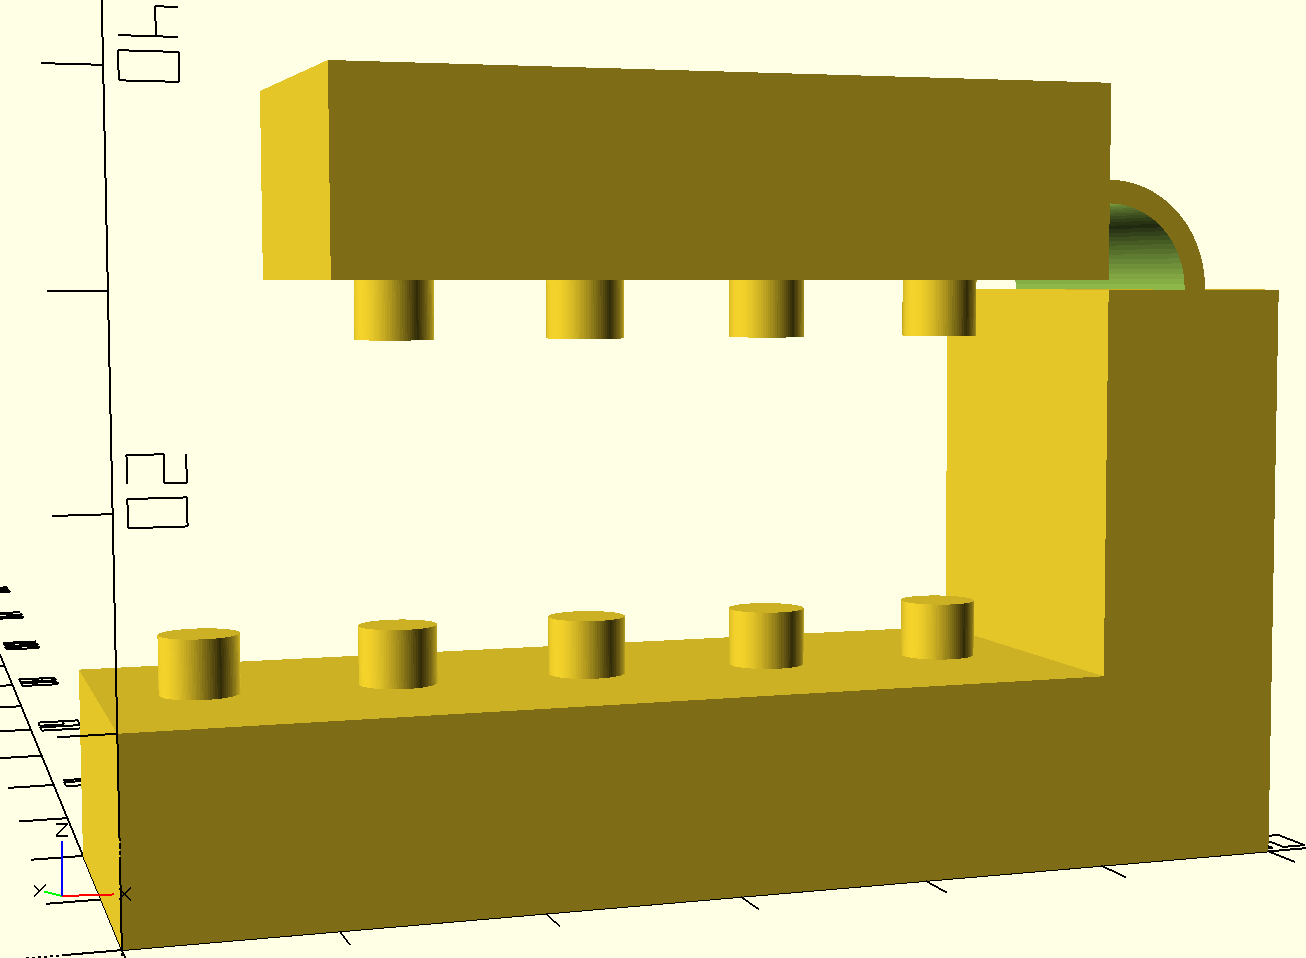
My piece is the base of the catapult and will allow to hold Emma’s piece. Here is a preview of it :
and this is the final code I created to form the piece with all the variables:
// FILE: phys-F517 piece 1.scad
// AUTHOR: Diane Bilgischer
// DATE: 7-8th novembre 2023
// LICENSE: Creative Commons Attribution-NonCommercial-ShareAlike 4.0 International (https://creativecommons.org/licenses/by-nc-sa/4.0/)

// parametre :
$fn=100;
emma=20; // a demander a emma pour la hauteur de sa piece
L1=50;
l=20;
h=10;
d1=10;
H=5;
r=2;
t=4;
y2=0;
z2=0;
y4=0;
ranger1=0;
L4=40; //en fonction piece emma
hbis=3;
//parametre a variable :
L2=emma+h;
trx=d1/2;
try=l/2;
x2=L1+h;
x4=L1;
z4=L2+h+0.5;
trz=h;
tlx=L1;
tly=l/2;
tlz=L2;
r1=(h/2)+0.6;
r2=(h/2)-0.6;
l1=2*r1;
x1=r1/2;
y1=x1;
//angles:
a=270;
b=180;
c=-90;
// parametre cylindre:
u=5;
ra=10;
rb=8;
//petit cylindre trou:
rt = 3;
ht = 3.5;

//cube 1 +plots:
cube([L1,l,h]);
translate ([trx,try])
    for (j=[0:ranger1]){
        for (i=[0:t]){
            translate ([i*d1,j*d1,h])
            cylinder(hbis,r,r);
        }
    }

// cube 2 sans plots :
translate ([x2,y2,z2])
    rotate([0,a,0])
        cube([L2,l,h]);


// arc de cercle :
translate([tlx,tly,tlz])
rotate([c,0,0])
difference(){
    difference(){
        cylinder(l,r1,r1,center = true);
        cylinder(l,r2,r2,center = true);
    }
    union(){
        translate([(-x1),0,0])
            cube([r1,l1,l],center = true);
        translate([x1,y1,0])
            cube([r1,r1,l/2],center = true);
    }
}

//Cube 3 +plots:
translate ([x4,y4,z4])
    rotate([0,b,0])
    union (){
        cube([L4,l,h]);
        translate([trx,try,trz])
            for (k=[0:ranger1]){
                for (m=[0:(t-1)]){
                    translate ([m*d1,k*d1,0])
                    cylinder(hbis,r,r);
                }
            }
    }
Here is the piece in 3D :
and here is Emma’s piece but without the variables :
// FILE:flexlinkfinal.scad
// AUTHOR: Emma Beuel and Diane Bilgischer
// DATE: last updated 17th novembre 2023
// LICENSE: Creative Commons Attribution-NonCommercial-ShareAlike 4.0 International (https://creativecommons.org/licenses/by-nc-sa/4.0/)
//cube 1 +plots:
difference (){
    cube([L1,l,L2-h]);
    translate ([trx,try])
        for (j=[0:ranger1]){
            for (i=[0:t]){
                translate ([i*d1,j*d1,0])
                cylinder(L2-h,r+0.8,r+0.8);
        }
    }
}
union (){// arc:
    translate ([L1,l/2,r1+(L2-h)/2])
    rotate ([a,-c,0])
    difference(){
        difference(){
            cylinder(l/2,r1,r1,center = true);
            cylinder(l/2,r2,r2,center = true);
        }
        union(){
            translate([(-x1),0,0])
                cube([r1,l1,l/2],center = true);
            translate([x1,y1,0])
                cube([r1,r1,l/2],center = true);
        }
    }

    // cylindre
    translate ([L1+40,l/2,ra+r1+(L2-h)/2-2]) {
    difference() {
        difference() { // fonction qui retourne la différence de 2 objets
            sphere(ra);
            translate(v=[0,0,1]) {
                sphere(rb);
            }
        }
        translate(v=[0,0,ra]) {
            cube(size = [2*ra,2*ra,2*ra], center = true);
        }
    }
    }
}
We will print our two pieces on the next module (module 3)
Licenses Creative Commons (CC)#
It’s a set of standardized licenses that allow creators to define the conditions of use of their work. Here is a link to a website with all the different possibilities of licenses, their meaning and their logos.
For my work, I chose CC BY-SA. This means that:
1. People can use my work and add modifications to it IF they credit me
2. People need to use the same license.
I chose CC BY-SA instead of CC BY because I think that our work need to be share and have the opportunity to evolve. If I had taken the license CC BY people could have change the licence and not let others use their work, or add modifications to it which is not what I wanted.
The license chosen will be indicated at the beginning of the file with the name of it, the date and the author(s) name(s)